Stripe recurring subscription with card or SEPA payment with 3DSecure

This article is written by Iryna Leskiv.
Introduction:
Stripe is the most effective payment service in the world. I know why it is so popular and why everyone uses it to implement payment on any website. The community is vast, the docs are well-written, reliable, and testable, and this tool allows you to implement whatever you want.
Yes, the documentation is pretty good, but I was utterly lost when I opened the docs the first time and tried to find what I was looking for. There are so much info/examples/API references, etc., that you don't know where to look. It seems to me that there are at least two ways to do the same thing, but I didn't know what approach I should use. After one week of investigation, three weeks of implementation, and one month of improvements, I finally can say, "I'm a professional Stripe googling person," meaning I know where to find that particular info to implement the new Stripe flow. I hope my personal experience will give you some input on where the caveats are and how you can overcome them fastest.
Prerequisites:
Firstly, you need to configure your stripe account here. Once it’s done, you will need your API keys.
Development:
Notice that I am not going to write everything in detail. Instead, I will explain how to create the subscription page with all the needed elements connected to the API with some code snippets.
Subscription workflow:
- Create the Stripe Product
- Create a Stripe Customer
- Create a Payment Method
- Create a Subscription
Create the Stripe Product:
What is Product in Stripe? According to documentation, a Product is what your business offers — whether that's a good or service. For example, you offer your service's Basic, Advanced, and Premium versions. Each version is a separate Product in Stripe, so our example has three products.
You can create your products and their prices in the Stripe Dashboard or with the Stripe CLI. I think it’s a little easier to create it from Dashboard, but if your company has a lot of products, you’ll need to add them every month — I recommend using Stripe CLI for that particular case.
Let’s make three different plans from our Dashboard. You must open the Add product page and create the Product per every plan. You need to fill in all the required data. Don’t forget to select Recurring and Monthly/Yearly billing periods (if you have the same Basic plan with monthly and yearly subscriptions, create two different Products with different Billing periods).
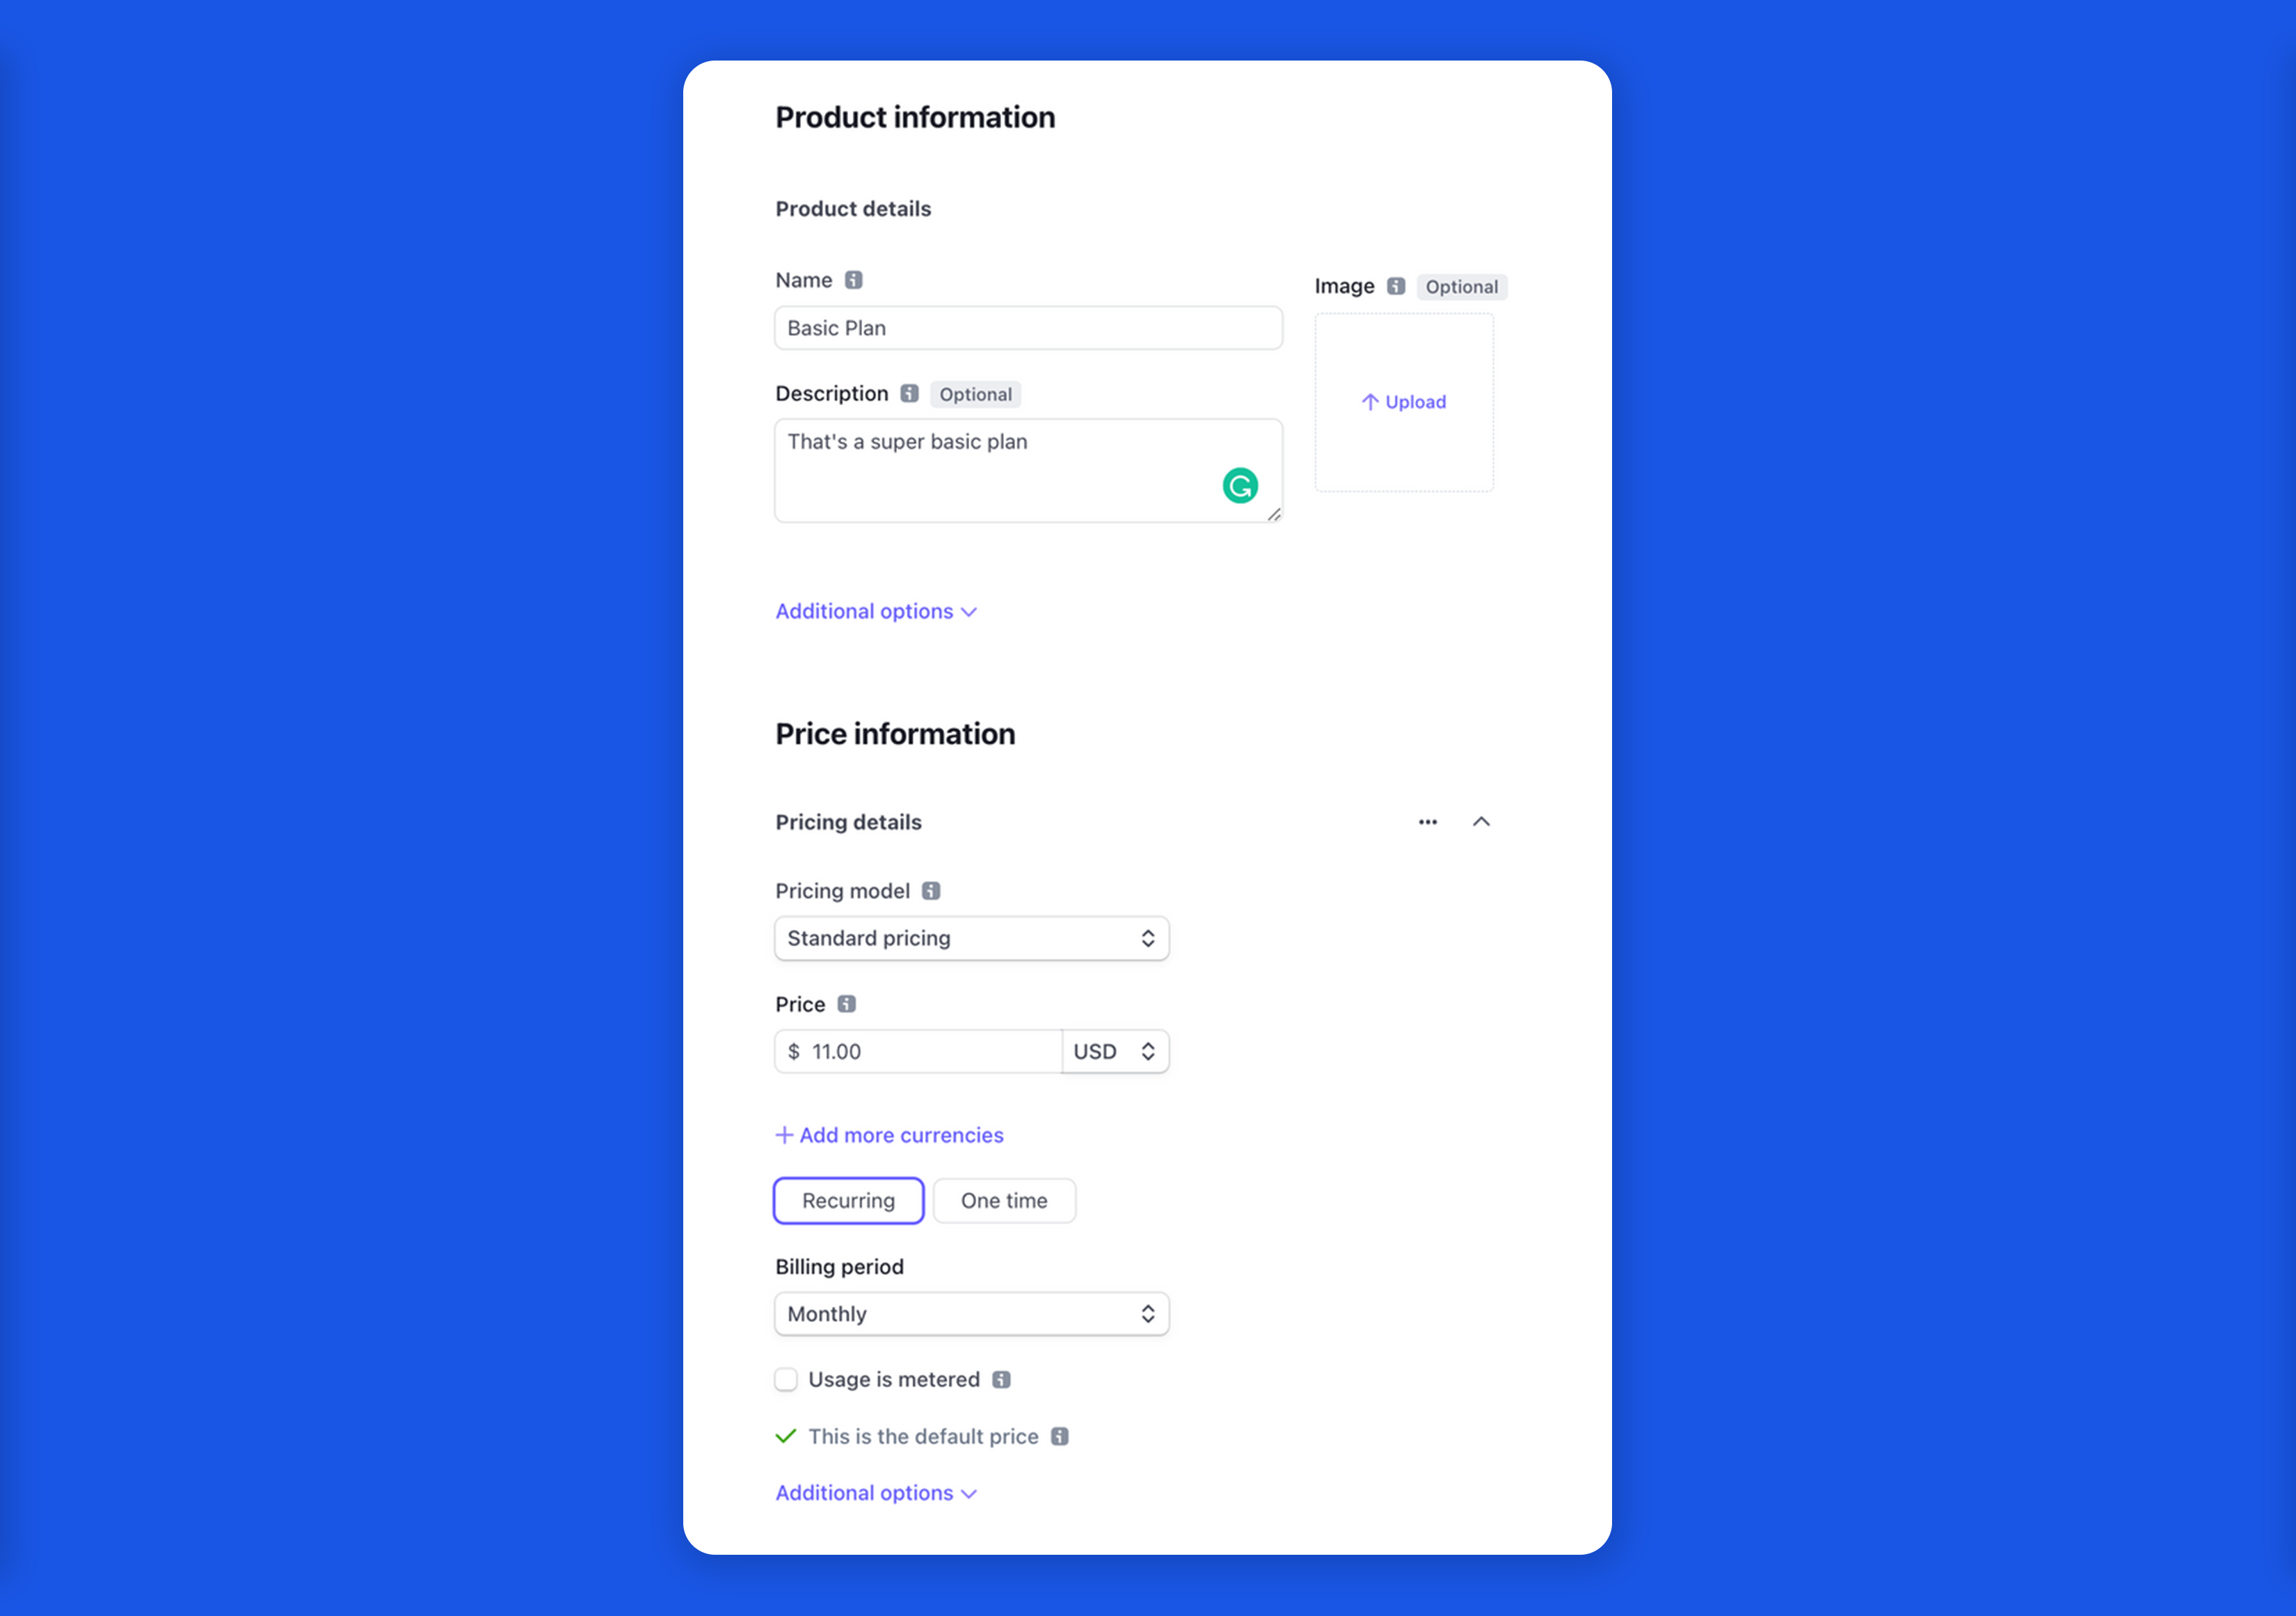

We did it; we've created our 3 Plans. What are we going to do next? To start a subscription, there are three more steps: customer creation, payment method, and subscription.
Let’s create the UI part for our Subscription page to put our card data there. We’re using React on the FE side, that’s why we’re going to use an amazing [@stripe/react-stripe-js] library, which is a thin wrapper around Stripe Elements. It allows you to add Elements to any React application. Also, I’m using the MUI library to style my components.
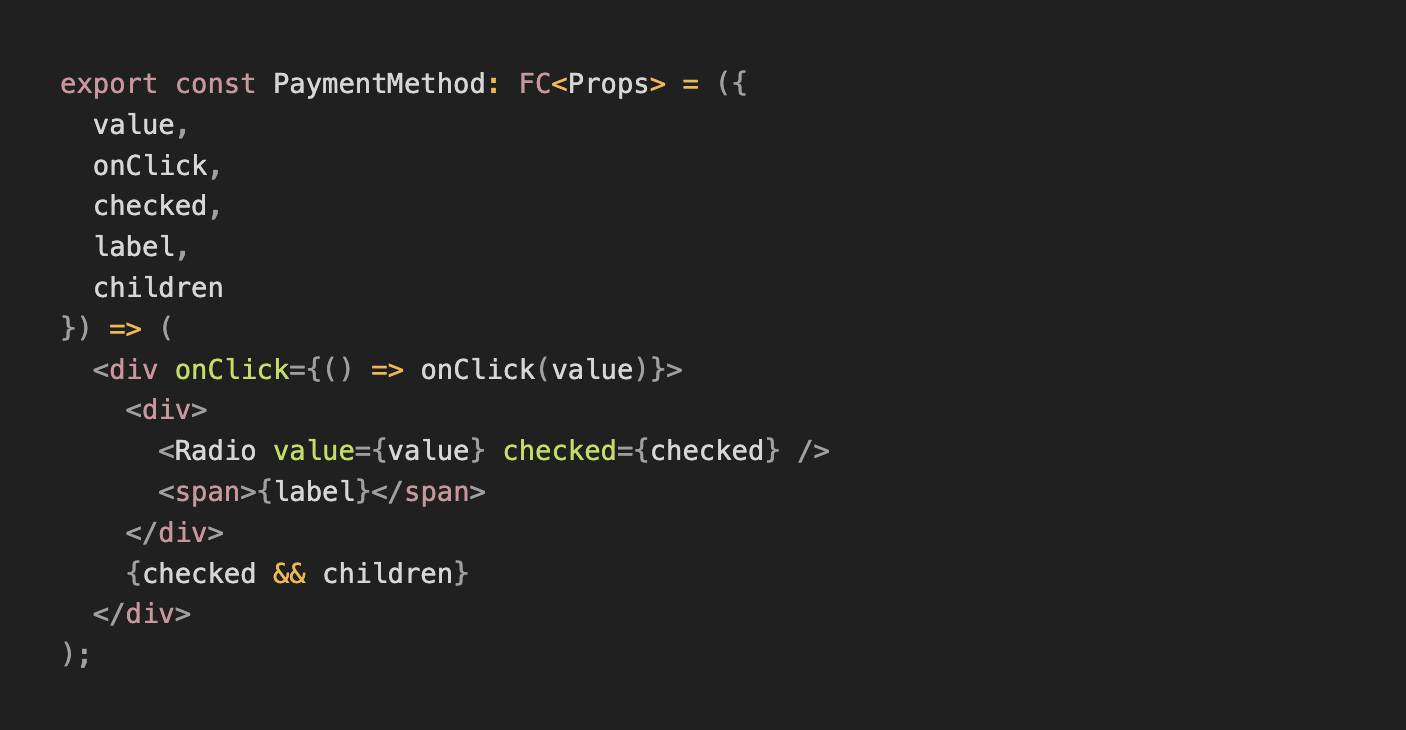
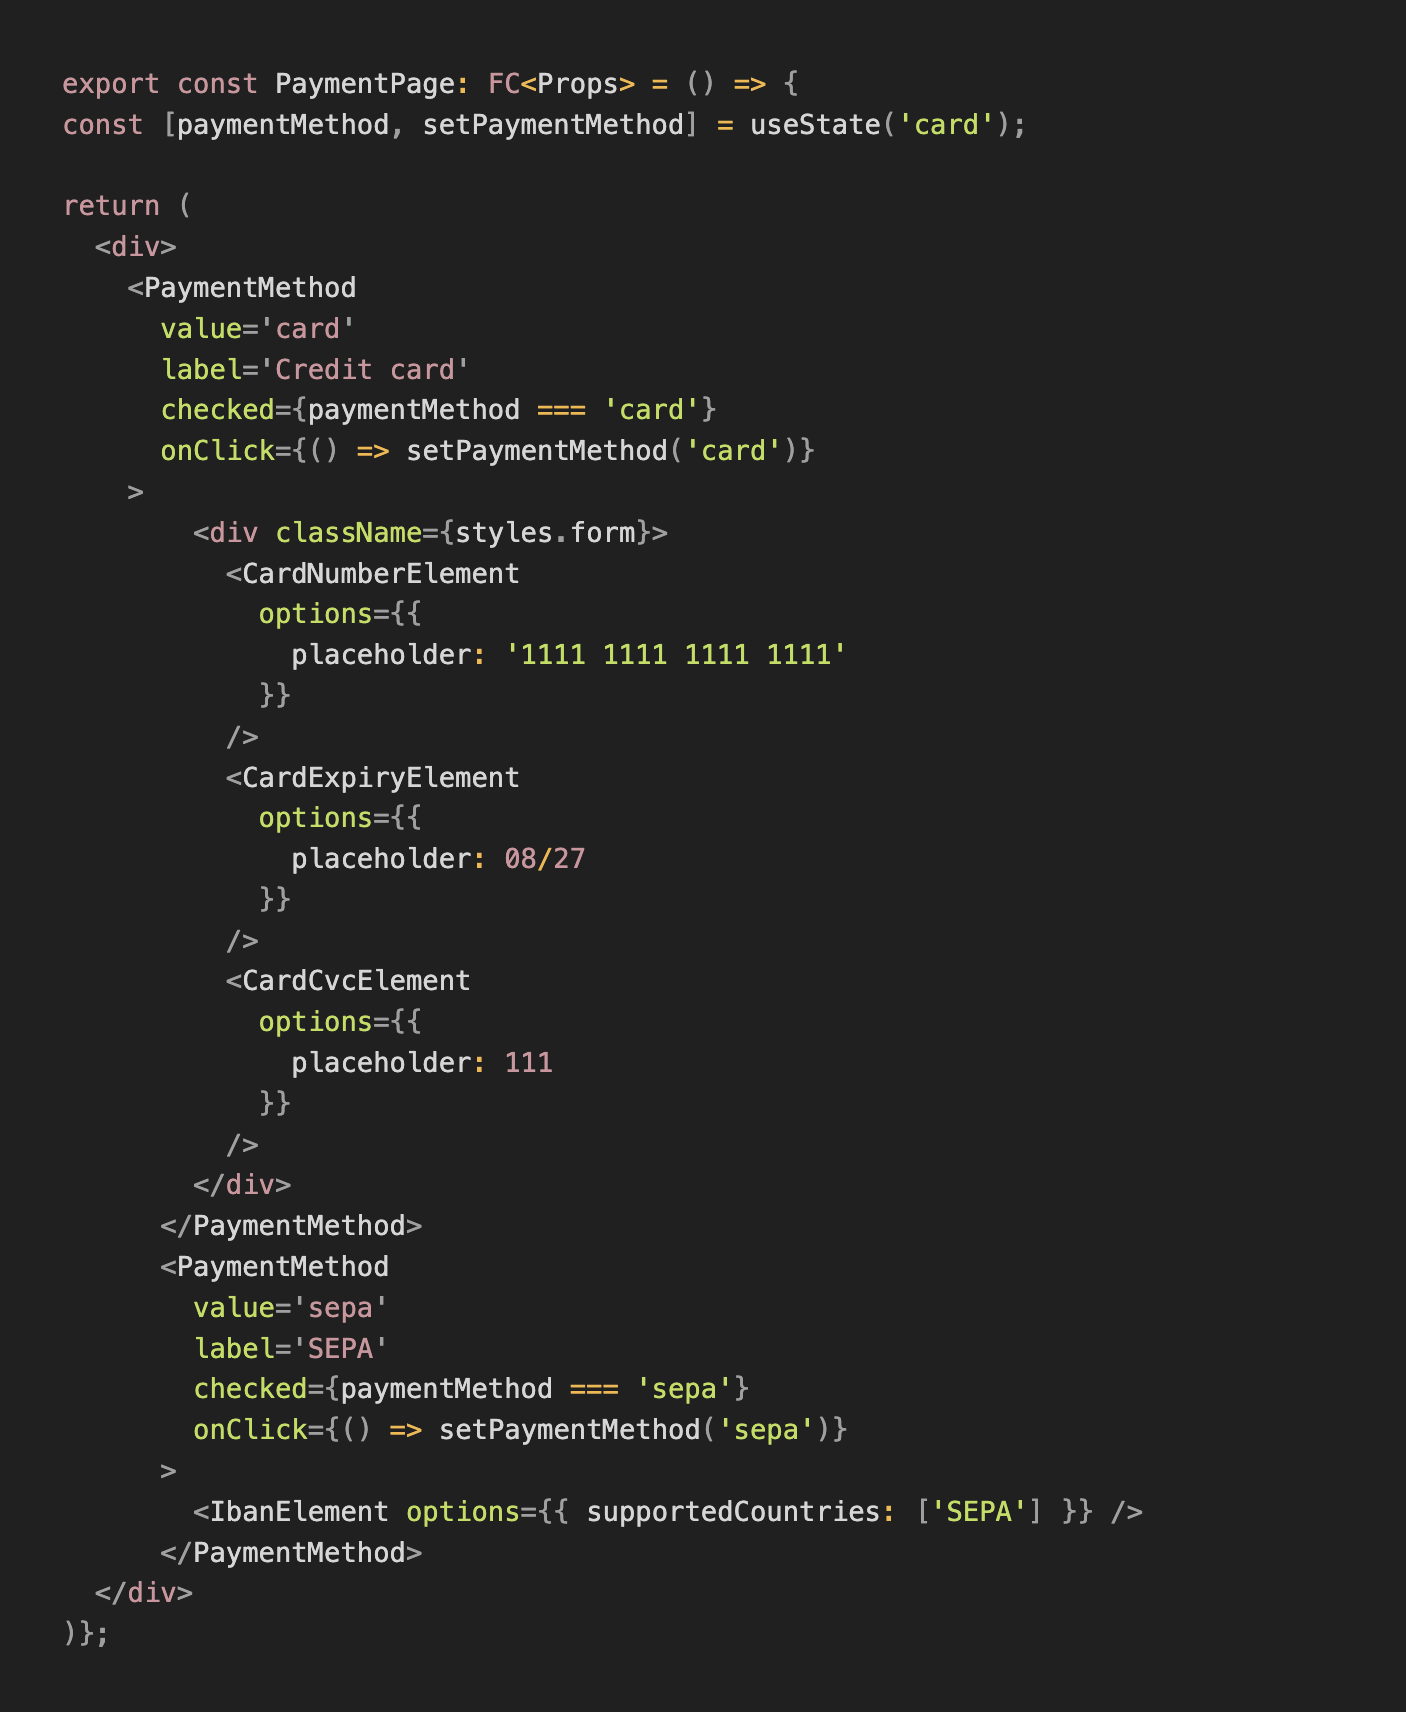
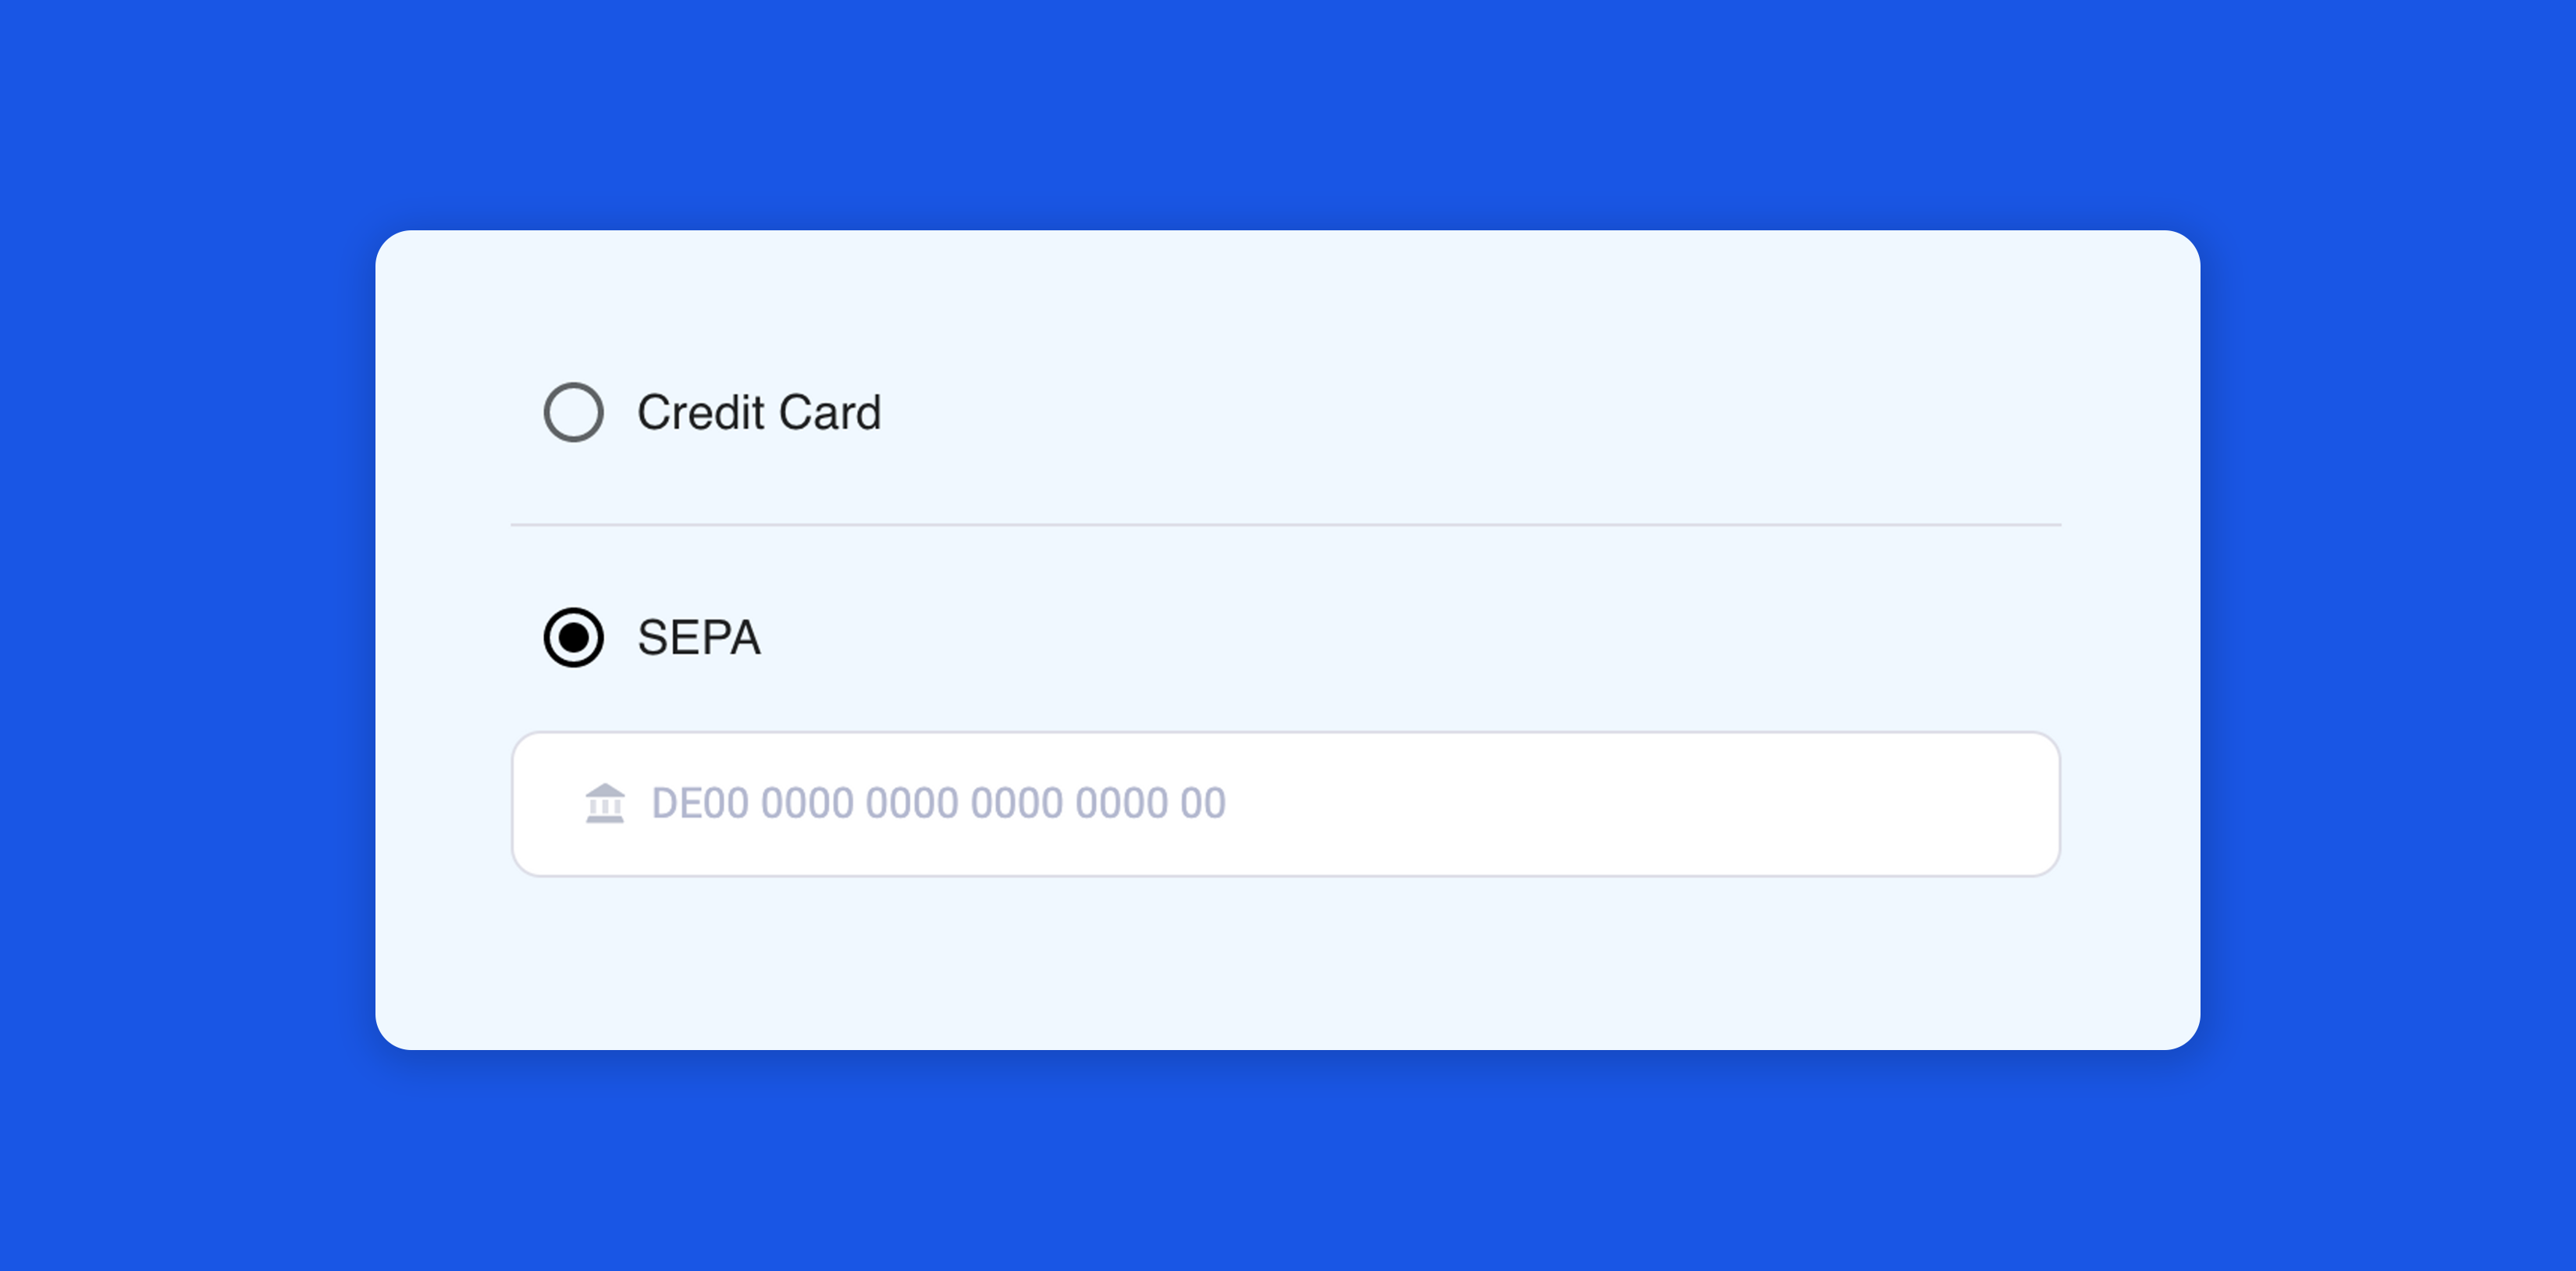
How does it look in the application right now:

Create a Stripe Customer:
Stripe Customer objects allow you to perform recurring charges for the same customer and to track multiple charges. If you create a Subscription — the Customer ID is passed to the subscription object.
Here’s the method on the BE side to createStripeCustomer. Add the stripe npm package to create stripe-related functionality on the BE side.

The next step is to create SetupIntent. It is needed for setting up and saving a customer's payment credentials for future payments. For example, you could use a SetupIntent to set up and save your customer's card without immediately collecting a payment. Later, you can use PaymentIntents to drive the payment flow.
Look at the usage: off_session property, which we’re passing into the stripe.setupIntents.create.It authenticates a credit card for off-session payments, so your customer doesn’t have to return online and re-authenticate. So, despite creating initial friction in the setup flow, setting usage: off_session can reduce customer intervention in later off-session payments.

When the createSetupIntent request is completed successfully — it returns clientSecret in response, which we will use on the FE side to create the PaymentMethod.
Create a Stripe Payment Method:
*Payment method* represents your customer's payment instruments. You can use them with PaymentIntents to collect payments or save them to Customer objects to store instrument details for future payments.
We’ve previously added an FE code with Stripe Elements to allow users to securely add card data so that customers can enter their card information from that view. Customers’ card information is collected and securely saved in Stripe, not in your server.
I’m going to add FE code which is calling the BE methods (which we’ve added above) to create customer → setupIntent → paymentMethod. So, the user enters card data and then presses Submit button, which calls onSubmit method:
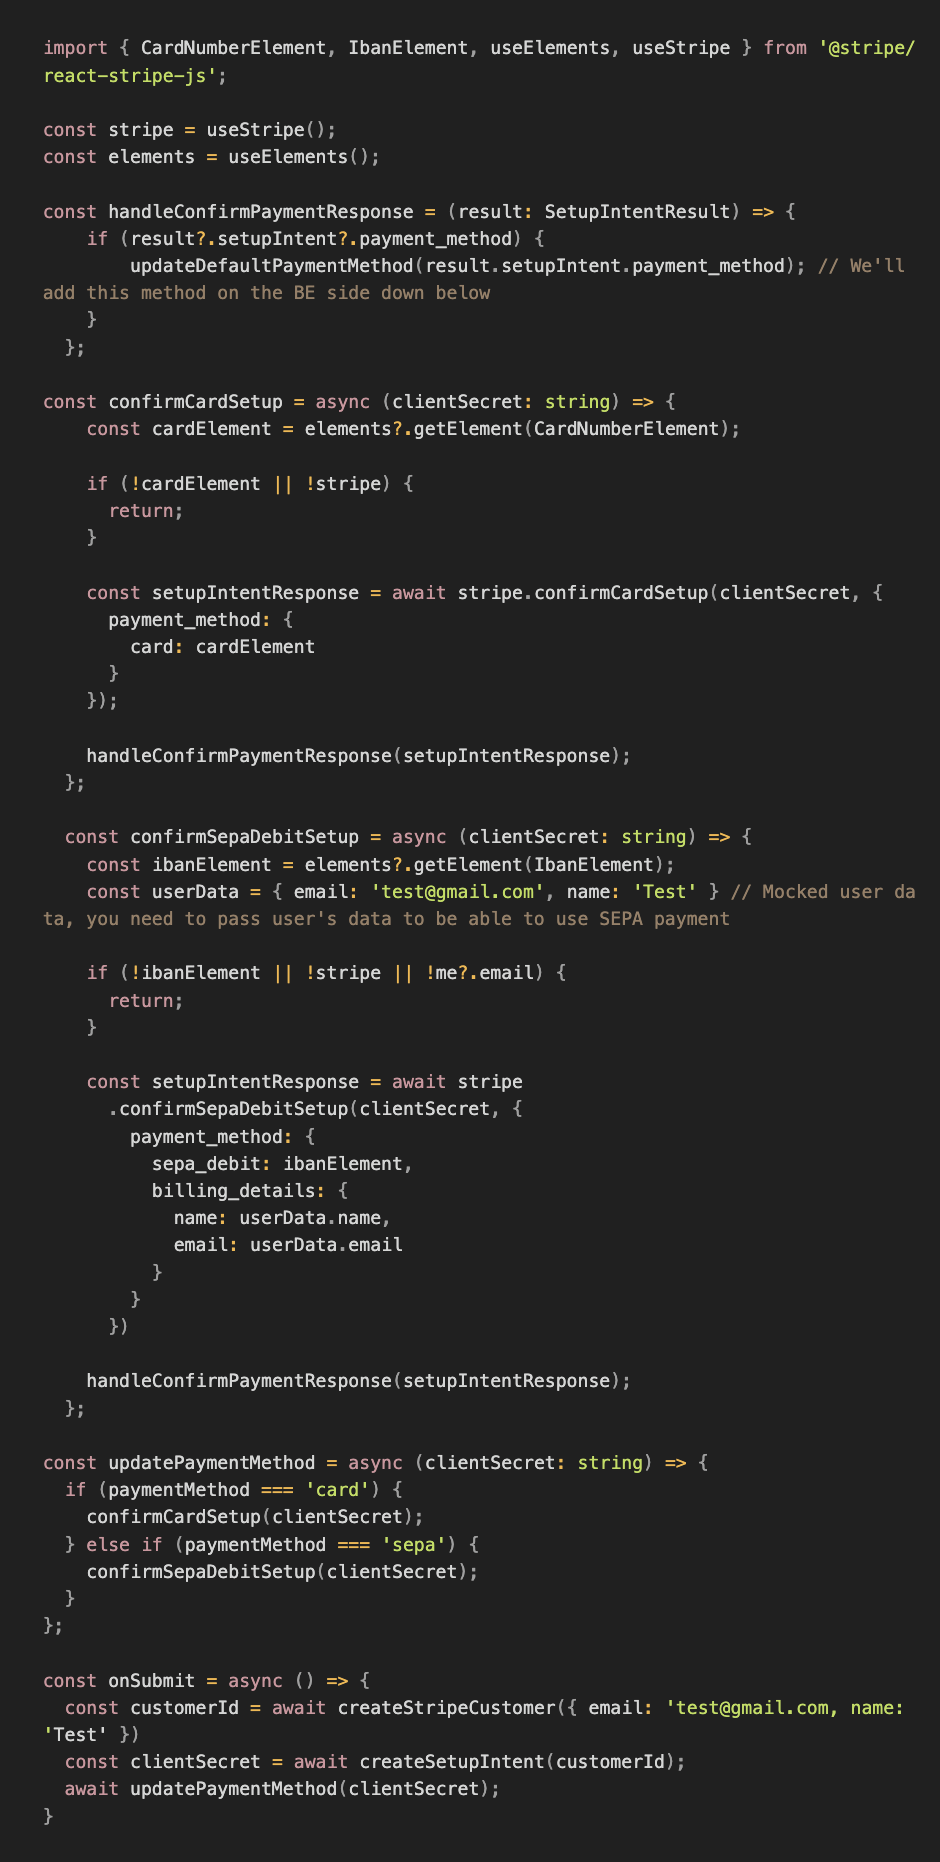
Since we’ve added the new PaymentMethod, we need to tell Stripe to which customer we want to connect this PaymenMethod as default.

And finally, as the last step — we’re creating the Subscription!
Create the Subscription:
On the BE side, we’re adding a new method for creating a subscription:
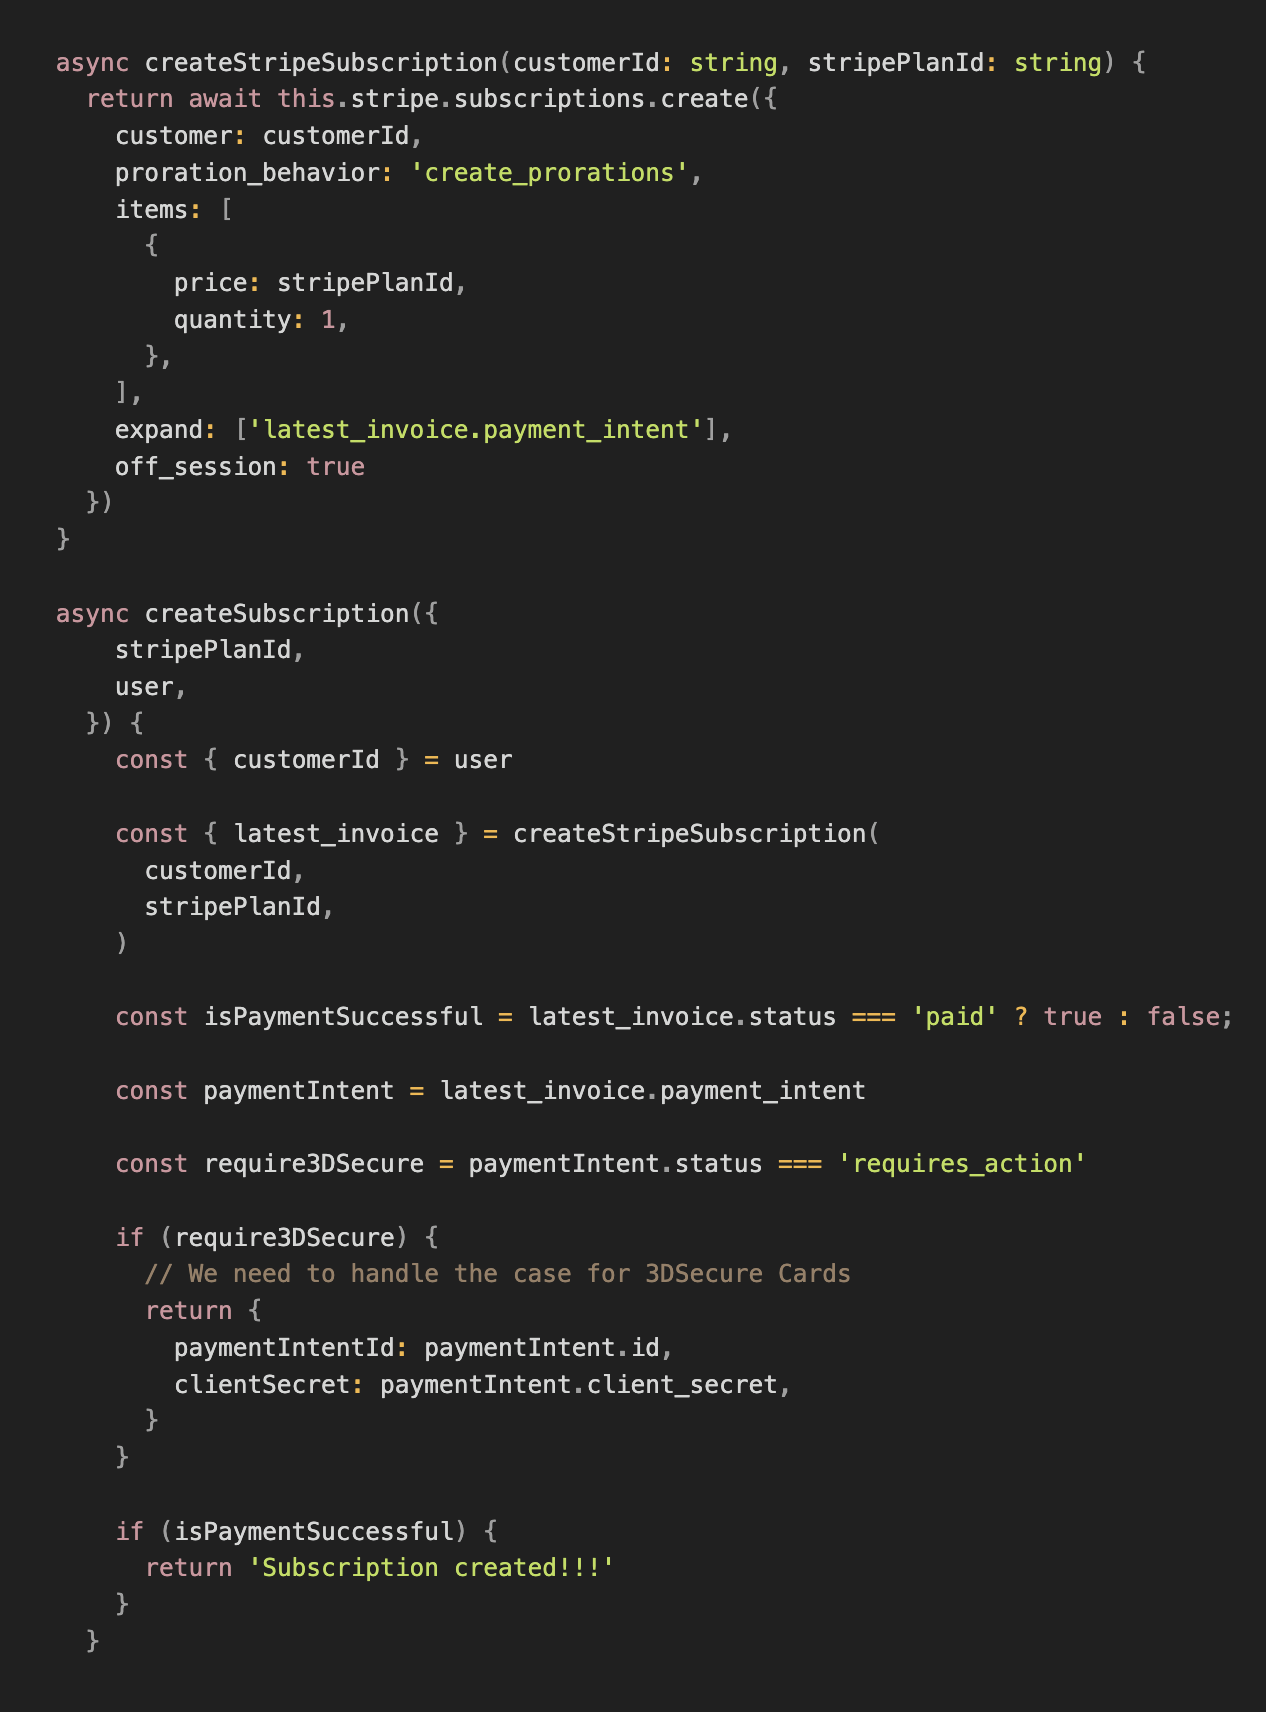
And on the FE side, we need to call it like this:

We did it! Congrats!
Conclusion:
That’s all you need to know to start working with Stripe and set up your basic Subscription flow. Stripe has a lot of other options like Upgrade/Downgrade, Send Invoice, etc., which I’ll try to cover in the following article. I hope you enjoyed it and it was helpful for you. Thanks for reading.
Have an outstanding idea? Let's engineer your breakthrough! Contact us ➡️
Let's engineer your breakthrough

79015, Smal-Stotskoho St. 1 Ukraine
50-062, Plac Solny 15 Poland


